Frosty Noel

I love soft blue and white winter cards – they look so elegant without having to fuss much.  And I love snowflakes die cut from our Dazzling Diamonds glimmer paper – they really do look so frosty!  So this card uses both and comes together very quickly.

Noel w

I started with a card base of Soft Sky cardstock cut 4-1/4″ x 11″, scored and folded at 5-1/2″.  Next I took a panel of Whisper White cardstock measuring 4″ x 5-1/4″ and ran it through the Big Shot using the Winter Wonder Textured Impressions embossing folder.  I cut a length of Silver Satin Ribbon to wrap around the bottom of the panel and adhered the ends on the back using Fast Fuse.  The panel was then glued straight to the card base with Multipurpose Liquid Glue.

Next, I stamped the letters on a scrap of Whisper White in Soft Sky ink.  The letters are from the Brushwork Alphabet stamp set – love that script font!  Then, I die cut each of the letters using the smallest of the Stitched Shapes square dies, and while I had the Big Shot out then cut 4 squares of Soft Sky cardstock using the next size up Stitched Shapes square die.  The letter squares are popped up onto their mats using Stampin’ Dimensionals.  The completed squares are glued directly to the embossed panel using Multipurpose Liquid Glue.

For finishing touches, I made a bow with more of the Silver Satin Ribbon and adhered it to the bottom with a glue dot.  I had some extra small snowflakes die cut from our Dazzling Diamonds glimmer paper left over from another card and they were perfect as accents here and there.  (The snowflake die is from the Seasonal Layers Thinlets set).  For an extra bit of sparkle I added rhinestones to the center of each  And that completed the card!

I hope you enjoyed this one – it really is quite easy to put together so I hope you will give it a try.  Let me know if you have any questions about how this card was made.  And if you need any supplies, please consider shopping with me by clicking the Shop Online button in the upper right.  I would love to be your demonstrator!

Ta for now!

Peaceful and Bright

Sometimes you just want a card that is simple yet conveys how lovely the season can be – when we forget about all the hustle and bustle that is!  Each Christmas Eve I try to take a moment to go outside, look at the sky and enjoy a quiet moment.  It really puts things into perspective.  Last year, I took my granddaughter out with me and even though she can be quite the chatterbox, she took my hand and just looked at the stars silently.  Maybe she will learn to do this as well and a new tradition will take hold for her.  Anyway, this card reminds me of the feeling I get then.

peaceful w

The card base is Cherry Cobbler cardstock cut 4-1/4″ x 11″, scored and folded at 5-1/2″ .  Next, I took a panel of Cherry Cobbler cardstock cut 3-3/4″ x 5″ and dusted it with the Embossing Buddy to remove any oils or fingerprints.  I grabbed the set of trees from Lovely as a Tree stamp set, inked it with Versamark and stamped it along the bottom of the panel.  I covered it with White Stampin’ Emboss Powder and then set it with the Heat Tool.  I then took the sentiment from the Star of Light stamp set, stamped it in Versamark, covered it with white embossing powder and heat set it.    I wanted just a few accents to balance the top of the card so took one of the small stars from the same stamp set, inked it Versamark, stamped it three times, and embossed them.

Such a beautiful panel called for a simple, elegant mat so I grabbed some of our gorgeous Champagne Foil and cut it just a teeny bit larger at 4″ x 5-1/4″.  The focal panel was  adhered to the foil with Tombow Liquid Glue and then this was mounted on Stampin’ Dimensionals and added to the card base.

Lastly, the inside needed a panel of Whisper White cardstock cut 3-3/4″ x 5″ which was adhered using Tombow Liquid glue.

This card is one I will make again and again for special friends who I know also enjoy those quiet moments during the holidays.  Maybe you have some friends like that too.  I hope you enjoyed today’s card.  If you have any questions about it please drop me a note and I will get right back to you.  All of the products used can be purchased from my online store by clicking the Shop Online button in the upper right corner.  I would love to have you as a customer!

Ta for now!

It’s All about the Blends!

I was so excited when the Big Brown Truck pulled into my drive yesterday afternoon!  Tearing open the package I was greeted with the explosion of color that is the new Stampin’ Blends!  Wanted to sit down and color with them right away, but my OCD took over so first had to make my storage container for them and that’s why you’re not seeing the card until this morning.  The only stamping I did for it was the sentiment, the rest was all DSP and the Blends.

welcome w

It starts with a base of Dapper Denim cardstock cut 4-1/4″ x 11″ and scored and folded at 5=1/2″  I next cut a panel from the Just Add Color DSP (I just love the aquatic scenes).  I did fussy cut the top just a bit for a cleaner image.  Then I pulled out the Blends and went to town coloring.  For the sand I used Light and Dark Crumb Cake and then alternated with Ivory and Bronze for the center section.  The underwater plants are Dark and Light Old Olive with a little Light Daffodil Delight in the center one to brighten it up.  The water is Light and Dark Pool Party (of course).  The corals are Light and Dark Calypso Coral, Light Night of Navy and Dark Daffodil Delight.  The shell in the foreground is Ivory and Bronze.  The angel fish are Light and Dark Rich Razzleberry and Dark Daffodil Delight.  The colorful guppies are done with Light Pumpkin Pie and Dark Bermuda Bay while the females are done with Light Smoky Slate and a touch of Dark Bermuda Bay.  Where I list only a light or a dark blend, I simply added layers to build depth – so easy to do!  I finished with a dusting of Wink of Stella on the fish and the corals.

After all the coloring was done, I grabbed my new Seaside Embossing Folder and ran the panel through the Big Shot.  Love the look it gives the scene!  The focal panel was then glued directly to the card base using Tombow Liquid Glue.

The sentiment is from the In The City stamp set and was stamped on a thin strip of Whisper White cardstock in Dapper Denim ink.  I ran the edges of the strip across the ink pad to give it some contrast and then popped it up using Stampin’ Dimensionals.  And that, as they say, is that!

I have to say that the new Stampin’ Blends are delightful to use – the color goes on smoothly and blends beautifully.  It layers like a dream so you can get depth even using just one value of the color.  You are definitely going to want to add these to your stash when they are released November 1st!

Hope you enjoyed today’s card.  If you have any questions, please leave a comment and I will get back to you lickity-split!  Ta for now!

Home for Christmas for the Stamp Ink Paper challenge #121

Hi y’all!  Decided it was time to take the plunge and participate in my favorite challenge group – Stamp, Ink, Paper.  So, here goes!

Sometimes, you look at a new stamp set and immediately know how you are going to use it for a card.  Doesn’t happen to me often, but when it does everything else gets put on hold until I can get that image out of my head and onto the paper.  And so it was with this card (I am still apologizing to my poor hungry husband about this one).

home for xmas w

I started with Dapper Denim cardstock.  Was going to use Night of Navy, but behind the vellum it was just too dark.  I cut the Dapper Denim to my usual 4-1/4″ x 11″, scored and folded at 5-1/2″.  Next I grabbed a piece of Whisper White and the Big Shot, and using one of the sets of houses from the Hometown Edgelits Greetings dies cut the background image.  This was mounted onto the card base using Tombow Liquid Glue.

So far, so good but really wanted a snowy look to it.  Our Vellum cardstock came to my rescue.  I cut a panel the same size as the card front and ran it through the Big Shot with the Softly Falling embossing folder.  Love how it softened the Dapper Denim and created that winter feel.

Then I got stuck on how to, well, stick the vellum to the card base without the adhesive showing?  Plus, I did want to give the card more depth.  I grabbed the Card Front Builder Thinlets and die cut the tree images.  These were glued directly onto the vellum with Tombow Liquid Glue.  So that took care of how I could attach the bottom.  Still needed a sentiment, so went to the Hearts Come Home stamp set and heat embossed it using our Silver Embossing Powder onto a piece of Whisper White cut with one of the ovals from the Stitched Shapes Framelits dies.  I popped the sentiment up onto the vellum using Stampin’ Mini Dimensionals.  Now I had three points where I could attach the vellum to the card base.

Great, right?  Well, no.  The top of the vellum was kinda flopping away from the base.  And I felt the card still needed a little something to finish it off.  Then I remembered out beautiful Silver Satin Ribbon.  I tied the tiniest of bows possible with the width of the ribbon and added it right at the top center of card giving me the final place to put a glue dot to solve the flapping of the vellum at the top!  Success!

While this card has a lot of elements to it, it really is fairly simple to put together.  I hope you will give it a try.  You can purchase the products used to make the card by clicking on the Shop Online button in the upper right corner.  I would be delighted to have you as my customer!  If you have any questions at all about the card please leave me a comment and I promise to get right back to you (well, after I feed hubby that is).  Ta for now!

SIP-Challenge-121-Tic-Tac-Toe-NEW-800-768x994

Frightful Fun

It’s that time of year again!  Little ghosts, fairy princesses, pirates and pumpkins  And what Halloween would be complete without a trip to the local pumpkin patch?

Today’s card is all about Halloween but from Bella’s perspective – instead of the perfect pumpkin she found a bone hidden among the colorful gourds.

Wynnie Halloween w

This card starts with a card base of Basic Black cardstock cut 4-1/4″ x 11″ and scored at 5-1/2″ for a top folding card.  Next came a layer of Spooky Night designer series paper, also cut 4-1/4″ x 5-12″ to which I added a strip of the 7/8″ Striped Ribbon.  This panel was then glued onto the card base with Tombow multipurpose liquid glue.

The focal panel is Whisper White cardstock cut 3-1/2″ x 2-1/2″.  Onto this I stamped Bella from the Bella and Friends stamp set and then used my Aqua Painter and Sahara Sand ink to color her in.  Once dry, I then masked her off and stamped the two solid pumpkins (1 large and 1 small) from the Pick a Pumpkin stamp set in Cajun Craze ink and the patterned pumpkin in Crushed Curry ink.  I then stamped the medium solid pumpkin and a small solid pumpkin onto a scrap of Whisper White and used matching dies from the Patterned Pumpkins Thinlets dies to die cut them.  These were added to the focal panel, popped up on Stampin’ Dimensionals.  The vines were cut from a scrap of Garden Green cardstock using the die from the same die set.

The sentiment is from the Spooky Cat stamp set and was stamped directly onto the focal panel using Memento black ink.  This was matted with the striped design from the Spooky Night designer series paper and popped onto the card base using Stampin’ Dimensionals.  The last steps were to add 3 black rhinestones and a die cut leaf I had left over from a previous card.

I hope you enjoyed today’s card; I just love all the different designs going on it.  I hope you will give it a try.  If you have any questions about how the card is made just let me know.  You can shop for the materials used by clicking the Shop button in the upper right corner.

Ta for now!

New Stampin’ Blends!

I love bringing you new product releases, and this one may just be among my favorites!  If you’ve been waiting for Stampin’ Up! to add alcohol markers to its product line of coloring mediums – the wait is over!  Introducing new Stampin’ Blends!

10.17.17_STAMPINBLENDS_SHAREABLE1_DEMO_NA

I am in LOVE with these easy to use markers.  The ink flows smoothly, blends beautifully and they are really easy to use!  I have tried other alcohol markers but the learning curve was always very steep – what colors go with what?  Stampin’ Up! has made this learning curve as easy as coasting downhill on a bicycle.  Each of the colors comes in two shades, for example Old Olive light and Old Olive dark, so there’s no scratching your head to try and figure out what will blend together.  And not only do they blend so beautifully, but you can build layers to create even more shades.  Let me show you what I mean…

In the picture below I used Cherry Cobbler light and dark to color the presents.  Look at the great shading you can get!  And Bella is colored with Bronze and Ivory.  If you look closely at Bella’s ear and face, you can actually make out 4 different shades of color – all from just those two markers and the color lifter.  I will be featuring more about coloring using the Blends when I post this card later but wanted to show what you can achieve using the new Stampin’ Blends.

Wynnie Christmas w (2)

Stampin’ Blends will be available for ordering on November 1st – just a couple of weeks away!  You can purchase them individually, in packs of 2 (light and dark of each color) or the entire set along with Bronze, Ivory and a color lifter (great for pushing back color that has escaped outside the lines).

There is a Color Me Happy Project Kit and Color Me Happy stamp set that will be available only while supplies last, but the Stampin’ Blends markers will be available through the upcoming catalogs.  And, Stampin’ Up! will have a series of great YouTube videos on how to use the new Blends so stay tuned for more!

As always, if you have any questions about the Blends or any of the other great products by Stampin’ Up! please leave me a comment and I will be happy to answer them.  If you don’t have a demonstrator, I would love to be yours so drop me a note below.  Ta for now!

Count My Blessings

blog header

Time for this month’s blog hop and I am so excited to be participating with such talented crafters!

The theme for this month’s blog hop is “Giving Thanks” in preparation for Thanksgiving next month.  And this Thanksgiving is going to be such a wonderful one as we are having a mini-family reunion and will have all 5 of the grandchildren together for the first time.  They are all girls and all love crafting as do 3 of us so-called grownups.  So it promises to be a great time and I am so thankful that we will have this time together as we are all from different states and don’t get to see each other as often as we would like.

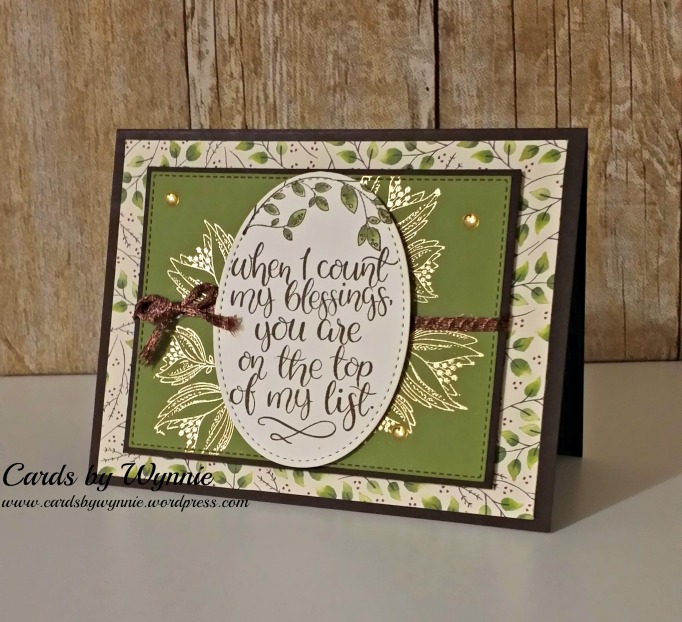
Now, on to the card.  I love embossing powder and don’t use it nearly enough so what a great opportunity to bring out a favorite stamp set and some beautiful gold!

Blessings w

The card starts with some Early Espresso cardstock for the base, cut 5-1/2″ x 8-1/2″.  It’s not my usual but wanted a big focal area to work with.  Next, I took a piece of Old Olive measuring 4-1/4″ x 3-1/4″ and stamped the lovely flower image from the Count My Blessings stamp set four times in Versamark. ink  This was sprinkled it with Gold Stampin’ Emboss Powder and heat set it with my heat tool.  This panel was matted with Early Espresso cardstock measuring  4-3/8″ x 3-3/8″ using Tombow Liquid Glue.  I then wrapped some of the Copper Trim around both panels just a tad higher than center and tied it in a bow.

The card base received a top mat of lovely paper from the Painted Harvest designer series.  The focal panel was then mounted on top of this using Stampin’ Dimensionals.

Now for the sentiment.  I cut an oval using the second largest die from the Stitched Shapes oval framelits and stamped the sentiment from the Count My Blessings stamp set in Chocolate Chip.  I LOVE this sentiment – it always stamps so bold and crisp and has a big impact on a card.  To tie it together with the patterned paper, I stamped the leaf image from Count My Blessings onto the top making sure to go off the oval.  I then colored the leaves in with the Old Olive Stampin’ Blends – folks you have got to get these Blends when they become available!  They are so easy to work with!  The oval was then mounted onto the focal panel, again using Stampin’ Dimensionals.  The finishing touch is 3 gold circles from the  Metallic Shapes.

And, that’s it!  I hope you will give this card a try – it really is quite easy and has a lot of bang for the buck.  The gleam of the gold from the embossing really makes this card special.

Ready for the next card on the hop?  Just click the next button below to see Jaimie Babarczy’s lovely creation.  And if you started with me, be sure to click on the previous button to see the beauty that Karen Finkle created.  Ta for now!

previous blog button next. blog button

And here’s the list of everyone participating in today’s hop:

  1. Karen Finkle – https://karenscardkorner.blogspot.com/…
  2. Linda Richenberg – http://wp.me/p8GiKS-jS
  3. Jaimie Babarczy – http://wp.me/p79UhD-1l0
  4. Julie Johnston –
  5. Mary Deatherage – http://wp.me/p5snyt-4iD
  6. Sue Prather – http://wp.me/p5yitZ-bc
  7. Jari Francis – http://wp.me/p6sTcz-1q5
  8. Barbara Staradumsky https://stampin2day.wordpress.com/2…
  9. Amy Koenders – https://wp.me/p2SFwf-9S6

North Pole cards

It was a cool, rainy day here yesterday – perfect for holing up in my craft room and designing cards.  I think I made about 20 of them yesterday LOL!  Designing cards is hit and miss with me, it either comes to me in a flash or I have to tease it out slowly.  Luckily, these two came quickly.

My brother was in the Air Force and I had the opportunity to visit him when he was stationed in Alaska some years ago.  Instead of living on base, he opted to live near a town called North Pole.  It of course had a huge Christmas village in it but what struck me more was how quaint the town itself was.  That was the inspiration for these cards.

Christmas town

They both start out exactly the same.  I cut Whisper White cardstock to 5-1/2″ x 8-1/2″, scored at 4-1/4″ and folded.  I pulled out the Hearts Come Home stamp set and arranged the three houses and two trees on a stamp platform until I had the layout I wanted.  This was stamped using Garden Green ink straight onto the card base.  I wanted more trees, so re-positioned them and stamped again in Garden Green ink.  Once I was happy with the number of trees, I added the sentiment, again from Hearts Come Home this time stamping with Cherry Cobbler ink.

I was happy with the design but felt it could be stepped up a notch.  Hmm, what to do?  Thought about die cutting some trees to add but really wanted to keep this simple.  Luckily, we have the Card Front Builders dies which will really add some pop to your cards.  But which of the dies to use?   Well I had two cards so why not try two different ones?  I love how clean and simple the frame die looks so that went on one.  And then those poinsettia flowers were perfect for the upper corners of the other one.  Once I ran each card through the Big Shot with the appropriate dies, I added a panel of Cherry Cobbler cardstock to the back of the front panel with Tombow Liquid Glue for drama and WOW did I love how that made each of them pop!  Lastly, I went over the roofs and trees with a little Wink of Stella.  A girl’s gotta have a little glitter!

So there you have it, two completely different looks using the exact same stamps.  I hope you have enjoyed today’s cards and will look through your stash to see what dies you can use to bring a little drama to your cards.

As always, if you have any questions about the card please drop me a comment below.    And if you are looking for a demonstrator, I would love to have you as a customer!  You can shop for supplies by clicking the shopping icon in the upper right corner.

Ta for now!

The Warmth of Christmas

Hi all!  Took a break from blogging for a few days to get all the cards done to send Cards for Soldiers.  If you missed that post from last week, please do have a look at it to find out more about this great organization.

Today’s card continues with the Christmas series.  I just received the Merry Patterns stamp set and could not wait to play with it.   There are so many ways to use it but I knew just what I wanted to do.  And that’s how this card came about!

Warm Xmas 3

It starts with a card base of Very Vanilla thick cardstock cut just a bit narrower at 4″ x 11″ so it would look tall and sleek.  This was scored at 5-1/2″, folded and burnished.  Now on to the stamping!

I chose the fill-in stamp for the reindeer, inked it up in Garden Green and stamped it onto the bottom portion of the card base – yup, right on the card base.  Was taking a chance there but since this set is photopolymer it was pretty easy to make sure I had it straight.  Next, I inked up the pine bough image in Garden Green and stamped it about 5 times in the upper right corner to give the card some balance.  I did stamp off for a couple of the branches to give it some depth.  Now on to the scary part – the sentiment!  I chose it from the Snowflake Sentiments stamp set – it is perfect to pair with the reindeer who looks to be wearing a sweater.  This was done with Garden Green ink as well.  Lastly, I cut a 1-1/2″ strip of the gorgeous plaid paper from Christmas Around the World  DSP pack and glued it using Tombow Mono Multi.  And that was that!

Easy card with a great look to it – I absolutely love how it turned out.  Hope you will give it a try.  Be sure to leave any questions about the card or the supplies used in the comments below and I will get right back to you.

Should you need to order anything, just click on the shopping icon in the upper right corner. I would love to have you as a customer!  You can earn the Merry Patterns stamp set with a $350 order so gather your friends and put in a group order.  The Around the World DSP is part of a buy 3 get 1 free group of papers through the end of the month.   And this month, every purchase comes with a little gift from me.  Could be ribbon, could be foil snowflakes or even the mini ornaments.  You just never know!  Oh, and don’t forget about the Paper Pumpkin kits for this month and next – they coordinate with each other just in time for your holiday crafting.  So many things going on it can make you downright dizzy!  I’m here to answer any of your questions about these or any other Stampin’ Up! products.

Ta for now!