Sneak Peek Stampin’ Up! 2019 Occasions and Sale-A-Bration – Lovely Lattice

At Onstage, we received advance copies of the Occasions and Sale-A-Bration catalogs.  Occasions and Sale-A-Bration open up to demos on December 3rd and to customers on January 3rd just in time to tackle those post holiday blues.  So, thought I would give everyone a sneak peek of some lovelies that will be available during that time, and you can get them for FREE!!  Yep, you heard me, each can be had free when you reach $50 in purchase.

I love using Sale-A-Bration items to show you how your dollars can stretch during this fabulous time. In this project, the designer sersies paper and the floral stamp set are both from the Sale-A-Bration catalogs. I used a new punch that will be in the Occasions catalog to punch out 3 butterflies from the paper – aren’t they beautiful accents?  Anyway, here’s a picture of the card of the card.

I started with a card base of Whisper White cut 4-1/4″ x 11″, scored and folded at 5-1/2″ for a top folding card.  I then cut a piece of the beautiful Botanical Butterfly Designer Series Paper (free with $50 during Sale-A-Bration) that is 4″ x 5-1/4″.  Next, I cut a 3-1/2″ x 4-3/4″ piece of Whisper White card stock to use for the design panel.

I inked up the floral stamp from the Lovely Lattic stamp set (free with $50 during Sale-A-Bration) in Smoky Slate ink and stamped it in the center of the design panel.  I then used Blends (Calypso Coral light and dark and Old Olive light and dark) to color in the flowers.  Coloring is so therapeutic!  When this was done, I adhered it to the DSP mat using Liquid Multipurpose Glue.  I thought our Granny Apple Green ribbon would look amazing with this, so I cut a 6″ piece and adhered it to the matted panel using glue dots, about 1/3 of the way up from the bottom.  This panel was then adhered to the card base using Stampin’ Dimensionals.

Next, I inked the sentiment from the Butterfly Gala stamp set (new Occasions item) using Smoky Slate, stamped it onto a scrap of Whisper White cardstock and used a 1-1/2″ punch to punch it out.  I then used a 1-3/4″ circle punch for the Smoky Slate cardstock mat and adhered the two together using Multipurpose Liquid Glue.  This was adhered to the card front centered over the ribbon, just to the right using Stampin’ Dimensionals.  Lastly, I used the Butterfly Duet (new Occasions item) punch to punch out three butteflies from the same DSP (note:  if you cut out the center of the DSP mat before adhering the design panel to it, you may can use this to punch out the butterflies saving paper).  These were adhered as shown using glue dots.  I did fluff up the wings a bit before sticking them down to give added dimension.

And there you have it!  It really did come together quickly and I love how feminine the card is.  I sure hope I have whet your appetite for all the new goodies coming in the 2019 Occasions and Sale-A-Bration catalogs!  If you don’t already have a demonstrator and would like the new catalogs once they are available, just drop me a note and I will be happy to send them to you.  Thanks for dropping by and talk to you soon!

Supplies

Country Lane Boxed Card Set

Continuing with our Christmas giftables, tonight I thought we would make a boxed card set featuring the Country Lane DSP. The lovely box was originally designed by Sam of Pootles Papercraft and it is so easy to make. The cards are clean and simple, perfect for writing a quick note. I think you will really like this quick project!

And, here is the video showing just how easy it is to make this set:

Details:

Cardstock cuts – 8″ x 8-1/2″ and 7″ x 4″

DSP cuts – 2 pieces cut 3-3/4″ x 3-3/4″, 2 pieces cut 5-1/4″ x 3-3/4″ and1 piece cut 1-3/4″ x 3-3/4″.

I hope you enjoy the video and will give this project a try.  You can order the supplies by clicking on the item(s) below which will take you directly to my store!  Thanks for watching!

Product List

Stampin’ Up! Stylish Christmas for Amy’s Inkin’ Krew Team Blog Hop

blog header

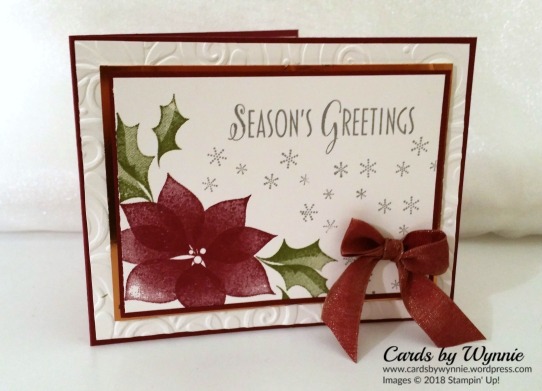
Welcome back to another Inkin’ Krew team blog hop!  Our very talented team is doing a blog hop featuring Stampin’ Up! products.  Our theme this month is “Christmas or Happy Holidays”.  We have some really amazing holiday stamps in both the annual catalog and the holiday catalog so I decided to pull from both for my card.  Here is what I created:

Stylish blog post w

I started with a piece of Merry Merlot cardstock cut 4-1/4″ x 11″, scored and folded at 5-1/2″.  Normally this would give me a top folding card but I decided that it would be a side fold so I could maximize using the beautiful poinsietta stamp.  The design panel is a 4-1/2″ x 3-1/4″ piece of Whisper White cardstock.  I inked up the poinsietta stamp from Stylish Christmas in Merry Merlot ink and stamped it in the lower left corner.  The leaf stamp was inked with Old Olive and then stamped on either side of the poinsietta. The greeting, from the Stylish Christmas stamp set, was inked in Smoky Slate and stamped in the upper part of the pane, slightly to the right for balance.  There is a cute snowflake cluster accent stamp in the Snow is Glistening stamp set (part of the Snowflake Showcase suite) which I inked in Smoky Slate and stamped between the greeting and the stamped images.  This design panel was then mounted on a 4-5/8″ x 3-3/8″ piece of Merry Merlot cardstock using multipurpose liquid glue.  This was then mounted onto a 4-3/4″ x 3-1/2″ piece of our beautiful Gold Foil, again with multipurpose liquid glue.  I then took a 4-1/8″ x 5-3/8″ piece of Whisper White and ran it through the Big Shot with the Swirls and Curls Embossing Folder.  This was adhered to the Merry Merlot card base using multipurpose liquid glue.  The double matted design panel was adhere to this using Stampin’ Dimensionals.  A lovely little bow made with the lovely Merry Merlot & Copper 5/8″ Reversible Ribbon was attached to the bottom right using a glue dot.

For the inside sentiment panel I started with a 4″ x 5-1/4″ piece of Whisper White cardstock.  The floral design strip is from the Dashing Deer stamp set.  It was inked in Merry Merlot and stamped at the top center and bottom center.  The sentiment, from the Stylish Christmas stamp set, was inked in Smoky Slate and stamped in the center of the panel.  Finally, the completed sentiment panel was adhered to the inside of the card using multipurpose liquid glue.

I hope you enjoyed the card and will give it a try.  A list of the supplies is below the blog hopping information.  Click on any of the pictures in the supply list to be taken to my store for purchase.  Thanks again!

Now on with the hop!  Click the Previous button to see the card by Karen Finkle or the next button to see Connie Troyer’s entry.

previous blog button  next. blog button

Product List

Wonderful Moments Baby Card

Wonderful Moments is a very popular set but I haven’t made many cards with it. Well, a friend just became a gramma again so I thought I would use this lovely stamp set to make a congratulations card for her. I think she is going to like it!

Baby Card w

Card cuts:

  • Very Vanilla cardstock – 3-3/4″ x 5″
  • Frosted Floral DSP – 4-1/4″ x 5-1/2″
  • Mossy Meadow cardstock – 3-7/8″ x 5-1/8″

And here is a link to the YouTube video:

I hope you enjoy the card.  Should you need to order any of the supplies used, please click on the link below to be taken right to my store.  Thanks for stopping by and have a great rest of the week!

Product List

Happiness Surrounds Stamp Set and Dies

Happiness Surrounds is the second stamp set from the Snowflake Showcase Suite. I love the floral images in this one, so today we incorporated both the stamps and dies into a lovely, uplifting card.

Happiness surrounds w

And here is the video tutorial:

I hope you enjoyed today’s card.  The stamp set and dies are a part of the Snowflake Showcase which will be available for purchase by customers on 11/1/2018.  See you Tuesday night!


Thankful

blog header

Time once again for another Amy’s Inkin’ Krew blog hop and this month’s theme is giving thanks.  The Country Home stamp set and Country Lane DSP are perfect for creating a card that is all about being thankful for those special people in your life.

Thankful w

I wanted to use at least some non-traditional colors, so went with the richness of Blackberry Bliss as the main color.  The card base is a piece of Blackberry Bliss cardstock that is cut 8-1/2″ x 5-1/2″, scored and folded at 4-1/4″.  That makes it a side-fold card which gave lots of room for the lovely stamped images.  I used a pice of Whisper White measuring 3-1/2″ x 4-3/4″ for the design panel and stamped as follows:

  • Milk can was stamped using Gray Granite ink and colored in with both the light and dark Smoky Slate Blends.  I then stamped the oval with Tuxedo Black stamped off and then stamped Love in the center with the same ink, again stamped off.
  • The floral cattail and leaves image was stamped in Gray Granite and colored in with Soft Suede dark for the cattails, Blackberry Bliss light and dark for the leaves, Old Olive light and dark for the artichoke, Crumb Cake light for the smaller leaves and Daffodil Delight dark for the berrries.
  • The sentiment was stamped in Blackberry Bliss.

The design panel was then glued to a piace of Blackberry Bliss cardstock measuring 3-5/8″ x 4-5/8′.  I wrapped a length of Braided Linen ribbon beneath the sentiment and secured to the back using Mini Glue Dots.  I then mounteda piece of the beautiful Country Lane DSP which measures 4″ x 5-1/4″ to the front of the card base using Multipurpose Liquid Glue.  The design panel was placed on top of this using Stampin’ Dimensionals.  Lasty, I added three ofthe silver metallic pearls for accents.

I hope you enjoy the card and will give it a try.  Below is a list of all items used to make it.  Now on with the hop!  Just click on the Next or Previous buttons to see more thankful creations!


And here is the list of everyone blogging today – just click on the link next to their name to go to their post:

  1. Julie Johnston – https://wildwingcreations.com/?p=7877
  2. Karen Finkle – https://karenscardkorner.blogspot.com/2018/10/stampin-up-painted-harvest-for-inkin.html
  3. Karen Ksenzakovic – https://creativestampingdesigns.com/?p=328
  4. Jaimie Babarczy – https://stampitupwithjaimie.com/?p=8310
  5. Linda Richenberg -You are here!
  6. Connie Troyer – https://constantlycreating.me/?p=786https://wp.me/p8xvI6-cG
  7. Shirley Gentry – https://stampinwithshirleyg.com/?p=2205
  8. Mary Deatherage – https://stampsnlingers.com/?p=24092
  9. Sue Prather – https://stampwithsueprather.com/?p=2851
  10. Aurora Lopez – https://craftystamperdesigns.com/?p=781
  11. Amy Koenders –https://stampwithamyk.com/?p=46385


Product List

A Stylish Christmas Card

You know I love the DistINKtive stamps SU has come out with this year and Stylish Christmas may just be my favorite. Paired with some of the beautiful Joyous Noel DSP, it makes an elegant card perfect for the holidays.

Stylish Christmas w

You can see how it was made in this video:

Hope you enjoyed the video!  If you have any questions about the project, please drop me a comment and I will be happy to help you.  To order any of the supplies, just click on the image below and it will take you to my store with that item already in your cart.

Product List

Fall Migration

Sometimes, nature provides the best inspiration when it comes to cardmaking.  I looked out my window this morning and realized that in a few weeks the geese will be migrating, the trees will have dropped their leaves and frost will be in the air.  With that visual in mind, I went to my craft table and came up with this ultra-simple card.

fall w

This card uses very minimal supplies.  The trees are from the Lovely As A Tree stamp set, the geese are from the High Tide stamp set and the sentiment is from the First Frost stamp set.  I used Soft Suede ink for al the stamping.  The sentiment panel uses the die from Storybook Scene Thinlets dies.  I cut a second one out of copper foil to give it some grounding.  Copper ribbon completes the front panel which was then mounted onto Merry Merlot cardstock.  I wanted to keep the front panel monochromatic and I love the depth the Merry Merlot base it gives it.

If you have any questions about the card, please leave me a comment below and I will be sure to answer it.  Should you need any of the supplies, just click on the image in the supply list below to order.  Thanks so much and I hope to see you during our Facebook live today at 3 pm ET!

Product List

Spirited Snowmen Gift Card Holder

We had our retreat last weekend and Julie Johnston shared this project with us so just had to make it for y’all!  Gift cards are so popular for holiday gift giving but need a pretty package to go with them. This cute gift card holder is perfect and so easy to make that you can whip them up in no time! And with all the beautiful Christmas DSP we have, the hardest part will be deciding what pattern to use!

gift card holder w

You can view the video tutorial below:

Below is a list of the supplies used.  To purchase any of these just click on the image and it will take you directly to my online shop and place it in your basket.  I would be happy to help you with any questions you may have so don’t hesitate to drop me a comment below.  I really hope you will give this a try!

Product List

Country Home Explosion Box

I am not really a country decor girl , but when I saw the Country Home Suite, I had to have it! So, today’s project will be an explosion box featuring most of the image stamps and that lovely DSP.  It really is easy to make and so much fun!  With all of the wonderful DSP in the Holiday Catalog, the possibilities are endless.explosion box w

And here’s the video tutorial:

I hope you will give this one a try – just imagine the delighted look on the recipient’s face when they lift the lid and viola!  See below for the list of supplies used.  To order any of the items used in this tutorial, click on the picture and you will be taken to my shop with that item already in your cart.

Thanks so much for watching!  See you Tuesdsay night for the next fun project!

Product List